There are many 26" forks out there but there is virtually nothing in the 20" size that is both good and cost effective for use on a kids MTB.
Building a complete fork from scratch is a lot of work, but what about modifying a 26" fork to suit?
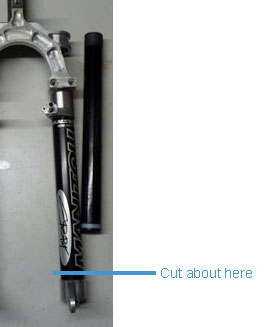
To convert a 26" fork into a 20" fork involves shortening both the stanchions and the outers. For my present application (20" racing BMX rim) both needed to the 50mm shorter.
- Note: there are at least two different sized rims that are called 20" - the rims I made this fork to suit are off a racing BMX. Freestyle BMX rims seem a different diameter. If you intend to modify your fork then make sure you make your own measurement as your 20" rim may be different.
26" fork options
I have only been able to come up with two possible choices as a base for modification
- some really old Marzocchi forks that have all the internals quite high up on the fork and the lowers have nothing in them so they can be cut shorter to suit a 20" wheel; or
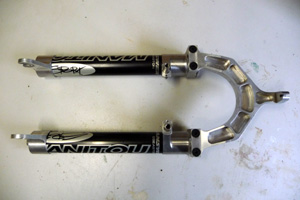
- early Manitou 1, 2 and 3 forks.
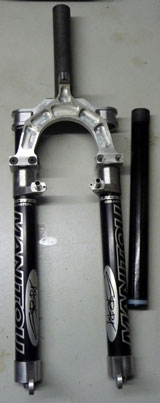
Why a Manitou 1,2 or 3 fork?
It would be very difficult to modify a fork that used cast outers. You could cut the end off but how would you put the drop-outs back on?
The Manitou 1, 2 and 3's are made up of easton tubes pressed and bonded into CNC'd aluminium lugs. Shorten the easton tubes and re-attach the drop-out lugs and hey presto!
The process
Step 1 - fully disassemble the fork
Pull the fork completely appart. Its all pretty straight-forward. The only special tool you will need is a very long 5mm allen key or a allen key on an extension. I just cut down an allen key and welded it to the end of a length of square section rod.
Step 2 - cut the dropouts from the fork
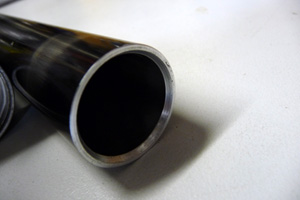
I cut the outer fork tubes about 5mm above where they enter the dropouts. This was so there was some "meat" of the outer tube left about the dropout to pull the tube out once machined. As it happened once the inside was bored out to almost full diameter it just fell out anyway.
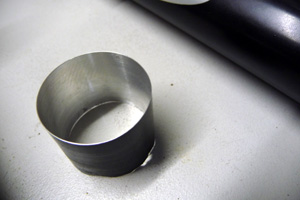
Step 3 - machine tubes from within dropouts
A lathe is essential at this point. Machine out the tube inside the drop out until is about as thin as beer can. As you approach this thickness it will then free up and come out of the drop out. Here's a picture of how thin you need to go:
Step 4 - machine outer tubes to required size
For my end wheel size this meant making the tubes 190mm long from the bottom of the brake bosses. It is impossible to clamp the outer tube in the lathe so I made up a wooden boss that would fit inside the leg to support it whilst machining the cut-end. If this is not machined properly square then you run the risk of the dropouts not sitting properly once you press then back on.
Step 5 - press dropouts back onto shortened outer tubes
This is fairly tricky as you need to make sure the dropouts are properly aligned. To do this:
- bolt the fork brace back onto the now shortened outer tubes;
- clamp the dropouts between a front hub etc. to make sure they are spaced properly and parallel. I didn't have a front hub at hand so I made a 100mm wide spacer out of some 18mm OD aluminium tubing. Both ends were machined flat on the lathe. A bolt through the dropouts and spacer then held the dropouts together for assembly;
- use some retaining compount - I used loctite 609. Loctite 680 is a higher strength alternative;
- start pressing the dropout assembly onto the outer tubes - you will need a proper press for this, it is essential that the dropouts go on square and together to begin with, but they are a tight interference fit so a deal of pressure is required;
- once both dropouts are on about 5mm its time to remove the dummy axle and then press each dropout home individually. You'll have much better control this way than if you try to do both at the same time.
Step 6 - shorten the stanchions
Put them in the lathe and take off 50mm. The Manitou Sports have a push on cap so you need to machine a little chamfer on the inside so they go on nicely:
Step 7 - put it all back together
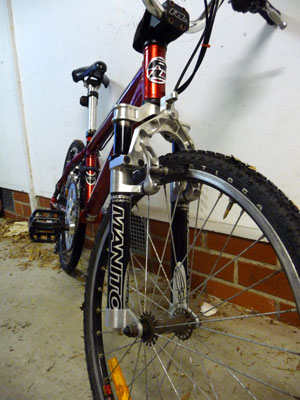
Hey presto! A 20" fork:
Additional modifications
The BMX bolt on axles are 3/8" in diameter. The standard MTB quick release dropouts are smaller, so the slots in each drop-out were machined out to 3/8". This was done in the mill before the dropouts were pressed back on the shortened fork legs.
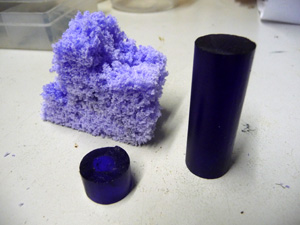
Elastomer mods
The elastomers from this fork were shot when I got it, You can get new elastomer kits for $45 but I didn't want to order some until I knew the 20" conversion was a success.
To get the fork working I took some unused elastomers that I think were originally for a RockShox Quadra 5. They come as a single solid rod of elastomer. To fit the Manitou's I needed to cut them and also put a 6mm hole down the centre. Cutting with a sharp knife was not a problem. I was also surprised that you could drill the elastomer as well.
Future mods
I need to get the softest elastomers possible. The converted RockShox Quadra 5 elastomers are just too stiff for a lightweight kid. They may also have hardened over time. In this fork they seem perfect for an adult but I think I need something half as soft for my kids to be able to use the full travel on these.
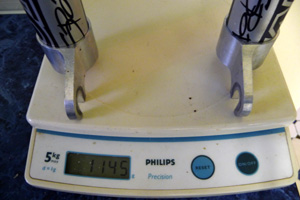
What's it weigh?
1145g all up for a 20" 40mm travel fork. With such short travel this fork feels nice and stiff/strong. Plenty for whatever an 8-10 year old can dish out.
On the bike:
Other 20" fork options
It's many years since I made this 20" fork and in that time there have really not been any good 20" off-the-shelf fork options for kids. However, as of June 2015, SR Suntour have released a 20" version of their top-of-the-line Axon Werx air sprung fork. It has 80mm of travel, weighs around 1350g and comes complete with a 15mm thru axle. This sounds like a seriously good fork, although it is rumoured to be a the limited production run with a US$850 price tag!